Baked Pear Fans with Yogurt
Slice pear halves into fans, bake them with honey and ginger, and set them over cool yogurt with crisp cardamom breadcrumbs.
8 min read
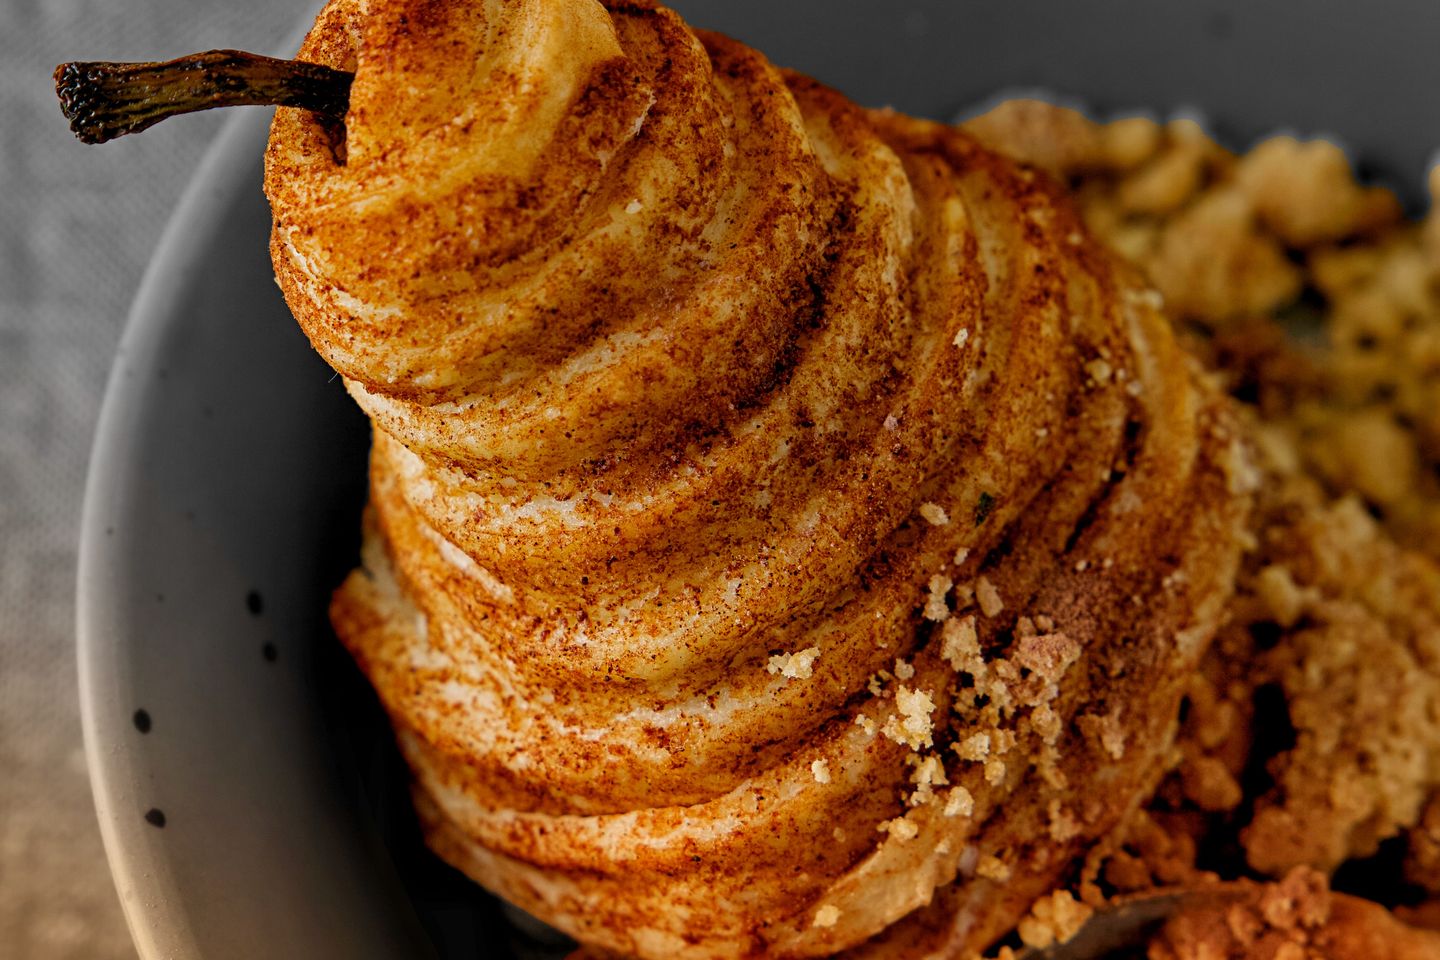
A pear that is almost ready to eat has a useful amount of firmness left. Cut thin lines down a half, leaving the narrow end attached, and the slices can be spread like the pages of a small book. In the oven the edges color while the center stays juicy. There is more room for the honey and ginger to settle than there would be on the uncut surface of a pear half. There is also something to lift with a spoon at the table. A fan that keeps its shape is still tender enough for each slice to come away.
The pear is the only part of the dessert that goes into the oven. A dry skillet turns bread into crumbs with a little butter and cardamom. Keep those crumbs out of the baking dish and they will stay crisp until they meet the yogurt. Plain yogurt is sharp enough to pull the whole dish away from the sweetness of the pear and its warm juices. Use a thick variety that can hold a spoon track without dripping off the plate.
Ingredients for four servings
- 2 large firm-ripe pears, about 7 ounces each
- 1 tablespoon fresh lemon juice
- 2 tablespoons honey, divided, plus more to taste
- 1 teaspoon finely grated fresh ginger
- 2 tablespoons water
- 2 tablespoons unsalted butter, divided
- 1 cup coarse fresh breadcrumbs, about 45 grams, from plain day-old bread
- 1/4 teaspoon ground cardamom
- Fine sea salt
- 3/4 cup plain Greek-style yogurt
Choose a shallow baking dish that holds four pear halves without their edges overlapping. A nine-inch square dish is usually suitable. In a much larger dish, the small quantity of honey and juice can spread into a film and darken before the fruit softens. If you need to use a larger dish, group the pears together at one end and check the juices early. A melon baller takes out the seed pocket in one motion, although a sturdy teaspoon works too.
Bosc pears generally keep a good shape. Anjou pears work well, especially when their necks begin to give slightly under gentle pressure. Bartlett pears tend to soften and become fragrant earlier, and are better chosen while still a little firm for this method. Set the pears on the board and examine both sides. One soft bruise can be cut away if it is on an exposed edge. If the fruit feels soft around the entire middle, it is better suited to eating raw with the same yogurt and a spoonful of toasted crumbs.
Cut fans that stay together
Heat the oven to 375°F (190°C). Lightly butter the baking dish. Halve each pear from stem to base and use a spoon to lift out the seeds and a little of the surrounding hard flesh. Remove any loose stem. You can peel the fruit if the skins are particularly thick or marked, but the skin contributes some structure and is pleasant on most pears when baked. Leave the narrow end intact even if it looks slightly uneven. That piece will keep the slices attached.
Lay a half flat-side down on a cutting board. Make parallel lengthwise cuts about 1/4 inch apart, starting at the wide bottom and stopping roughly 1/2 inch before the narrow end. Push the point of the knife all the way through at the wide end. Near the neck, use the tip to finish each line while leaving the last section uncut. Five or six cuts usually do the work. Press lightly on the pear to fan out the free ends. If the half will barely spread, stop and check that each line cuts through near the base. Forcing an incomplete cut can break the fruit at the neck.
Arrange the fans in the dish with their flat sides facing down. Mix the lemon juice, 1 tablespoon of the honey, the grated ginger, and the water in a small bowl. Stir until the honey dissolves. If it is too firm to mix, warm the water slightly first. Brush or spoon the liquid over the fruit so some of it goes into the gaps. Dot the pears with about 1 tablespoon of the butter and add a very small pinch of salt. That is sufficient to bring out the flavor of the juice without making the finished dessert taste salty.
Bake until a spoon can separate a slice
Bake for about 25 to 35 minutes. Begin checking after 20 minutes, especially if the pears were already fairly soft. Spoon some of the liquid from the bottom of the dish over the slices once while they bake. If the bottom looks dry, add a tablespoon of warm water around the fruit. The pan liquid can become syrupy, but it should never go dark brown along the edges before the pears are done.
To check a fan, slide the tip of a paring knife into a slice near the center. The knife should come out easily. Check the neck as well. The end that holds the slices together remains the thickest part, so it will be a little firmer. That is fine if a spoon can still cut it at the table. If the outer slices are beginning to collapse but the neck is firm, turn off the oven and let the dish stand in its residual heat for a few minutes. If you started with hard pears and they still need appreciable cooking, loosely cover the dish with foil and return it to the oven. A little more steam helps the thick ends soften without drying out the thin slices.
When the fruit is tender, move the dish to a rack and let it stand about 10 minutes. The liquid becomes slightly thicker as it cools. If you used particularly juicy pears and it stays watery, spoon the liquid into a small pan and simmer it briefly. Two tablespoons of lightly thickened syrup are more useful on the plate than half a cup of thin juice. Taste first because reducing it will concentrate the lemon and ginger as well as the honey.
Toast the crumbs in a separate skillet
Coarse crumbs are easier to keep crisp than dust. Tear the bread into small pieces and pulse it briefly in a food processor, or rub a firm piece against the large holes of a grater. If your bread is very soft, leave the torn pieces out while the oven warms or toast them briefly before crumbling. Aim for particles between the size of a lentil and the size of a small pea. The crumb mixture can include irregular bits. Those are useful as long as nothing is so large that it can't be eaten with a spoon.
Melt the remaining tablespoon of butter in a skillet over medium heat. Tip in the crumbs and stir until they are evenly coated. Cook for 4 to 7 minutes, tossing regularly, until they smell like toast and look golden. The smallest bits color first. Lower the heat if they start to darken before the larger ones have dried. Turn off the heat, add the cardamom and a tiny pinch of salt, and stir for another few seconds. Transfer the crumbs onto a dry plate immediately. Spread them out so steam can escape rather than softening the crumbs in the middle of a pile.
If you want an even less sweet dessert, use rye bread for the crumbs and skip the final drizzle of honey. For crumbs with a more pronounced toasted flavor, replace a quarter of the bread with chopped almonds and add them to the skillet after the first minute. Unsweetened plain yogurt is especially good with that version. Whole spices should be ground fine enough to disperse. A visible piece of cardamom pod in a spoonful of yogurt is distracting.
Plate while the pears are warm
Stir the yogurt so it is smooth, then spoon an oval onto each of four small plates. There is no need to sweeten it yet. Lift a pear with a wide spatula, supporting the neck and the base at the same time. Set it next to or partly over the yogurt, then spoon a little of the ginger liquid across the middle. Add the crisp crumbs along one side and onto the exposed yogurt. The remaining tablespoon of honey can be drizzled over the four plates if the first bite needs sweetness. With a very ripe pear and some pan syrup, that last honey may be unnecessary.
If the pears break when you lift them, move several slices at once and lay them against each other. The finished dessert will still have all of its textures. There is no particular advantage to reassembling them on the hot pan. In fact, separate slices are easier to share when one diner wants only a few. Put the remaining warm liquid into a tiny jug so each diner can add some to the yogurt. The crumbs are better left in a dry bowl until everyone has taken a serving.
For a meal with guests, make the crumbs early and hold them in a covered container at room temperature after they have cooled fully. Bake the pears when you begin eating dinner, or bake them earlier and serve them cool. Let the yogurt come out of the refrigerator only shortly before serving so the contrast between cool and warm is clear. If you have leftovers, refrigerate the baked fruit and yogurt separately and use the remaining crumbs as a topping the next day. A cold baked pear slices neatly across its fan and can be laid on toast with a spoonful of yogurt. A drop or two of the saved syrup is usually enough to season it.